VEL#053 - Configure PAX A920 Integrated payment option with Veloce
VEL#053 - Configure the PAX A920 Integrated payment option with Veloce
Veloce Workstation's setup for a complete payment integration with the PAX A920

Prerequisite
1. Veloce 9.56.0
2. PayFacto's merchant account
3. Pax terminal
A920 compatible
4. Microsoft .NET Framework 4.8
Backoffice Configuration
EFT Module
Backoffice
Electronic funds transfer
Configuration / Configuration
Protocol : PayFacto Canada or PayFacto USA
Model : PAX generic
Speed : N/A
Time out delay : Between 100 and 200
Workstation's configuration
Backoffice
Point of sales control
Workstation
Workstation's setup
Select the workstation that will be used for the PAX
Interfaces tab
Enable EFT
Connection: Modern App
EFT ID: Blank
Workstation's Type
Under the workstation's setup, Material
Workstation type : Modern app workstation
Veloce application on PAX
The Veloce app can be downloaded on the PAX STORE.
Open the Veloce App
If it's the first time you open it, click on the gear at the top right (No credentials should be needed)
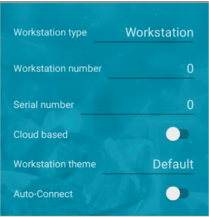
To configure the first panel
1. Touch the Workstation type list and select Workstation.
2. Touch Workstation number and enter the workstation number from the BackOffice.
IP: This is the number that appears in the title bar when configuring the workstation.
3. Touch Serial number and enter the 5-digit serial (license) number provided by Veloce.
4. Make sure the Cloud based toggle switch is set to Off.
5. Touch Workstation theme and select the desired appearance for the Veloce interface.
6. Touch the Auto-Connect toggle switch to On.
To configure the second panel

1. Touch Username and enter the terminal’s username (identifier) previously configured in the BackOffice. (Setup/Utilities, Configuration, System Configuration, Misc)
* To see the password, you must login to the backoffice with your reseller password (or the Veloce daily password)
2. Touch Password and enter the terminal’s password previously configured in the BackOffice.
3. Leave the Forced IP field blank unless otherwise directed by Veloce.
To configure the third panel
1. If you want to use the terminal’s scanner function (enabled by the Volume buttons) touch the Scanner toggle switch to On, otherwise, leave the toggle on Off.
2. If you want to use the terminal’s printer function touch the Printer toggle switch to On, otherwise, leave the toggle on Off.
3. If you want the terminal to process payments touch the Payment toggle switch to On (ALWAYS AT ON)
4. If you want the terminal to read cards on the card reader (e.g: gift cards) toggle switch to On, otherwise, leave the toggle on Off.
From there, make sure your PAX A920 is connected on the same network as the Veloce Server (WIFI on the same IP range) and you should be able to connect the PAX.
Method of payments configuration
You need to make sure that the payment modes used for credit/debit are enabled as 'EFT'
Backoffice
Point of sales control
Invoices
Payment modes
Select each method of payment
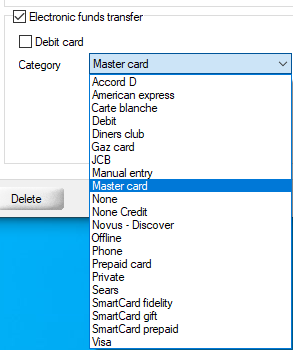
Under the Credit card tab
Check 'Electronic funds transfer'
For a debit (Interac) card, please check 'Debit card' also
Select the type of card